Valentines Snacks Mini Puff Pastries
Highlighted under: Sweet Table Classics
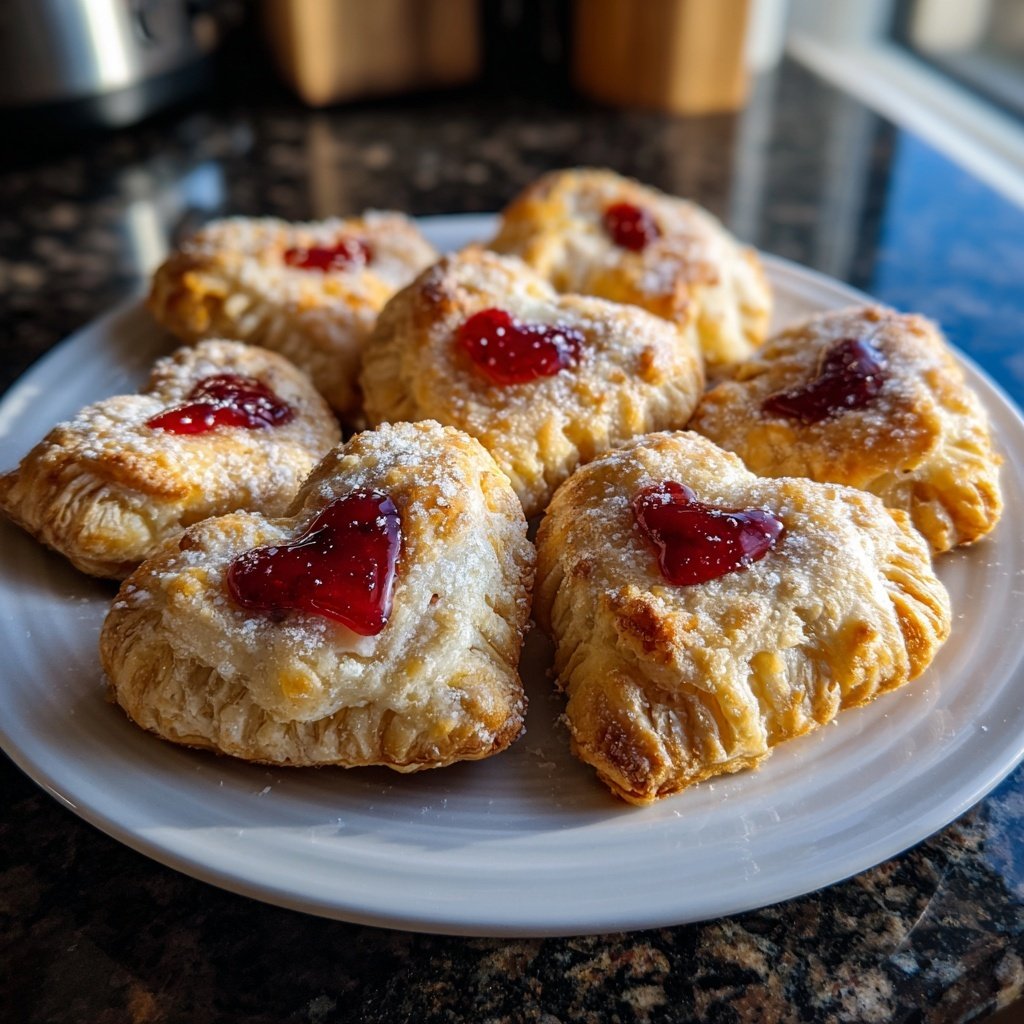
I love making mini puff pastries for Valentine’s Day! They are delightful bites that not only taste amazing but also look stunning. Whether for a romantic evening or gatherings with friends, these pastries fill the room with irresistible aroma and sweetness. The flaky texture combined with various fillings creates a burst of flavors in every bite. Plus, they’re surprisingly easy to make, and my secret is using high-quality puff pastry, which elevates them to another level of deliciousness. Let’s dive into this recipe for a fresh take on your Valentine's snacks!
When I first attempted to make mini puff pastries for a Valentine’s party, I was amazed at how easy and rewarding they were. The key is to ensure your pastry is well-chilled before baking, which created those perfect layers that puff up beautifully. Using a mix of sweet cheese and strawberries as the filling made these pastries a definite hit!
One noteworthy tip I discovered is to brush the tops with an egg wash before baking for that golden color and shine. This small step significantly enhances their appeal on the dessert table, making them irresistible to everyone. Enjoy crafting these delightful treats!
Why You Will Love This Recipe
- Flaky and buttery pastry that melts in your mouth
- Versatile fillings to suit every taste preference
- Perfect for sharing or indulging alone!
Choosing the Right Puff Pastry
The choice of puff pastry can significantly influence the outcome of your mini pastries. I recommend using high-quality, all-butter puff pastry for the best flavor and texture. The butter content ensures a flaky finish that melts in your mouth. If you are looking for a lighter option, you could consider using a reduced-fat variety, but be aware that the texture may not be as rich and flaky. By choosing an excellent pastry, you’ll elevate the overall experience of your Valentine's snacks.
Before you start working with puff pastry, ensure it is completely thawed. This makes rolling it out much easier and prevents it from cracking. I often leave it in the refrigerator overnight, so it’s ready to go the next day. As a rule of thumb, avoid letting the pastry get too warm, as it can lose its flakiness when baked. If it begins to feel too soft while you’re shaping it, pop it back in the fridge for 10-15 minutes.
Filling Variations and Customizations
While the sweet cream cheese and strawberry filling is a delightful combination, you can easily customize it to suit various tastes. Consider incorporating different fruits like blueberries or raspberries for a seasonal twist, or even try mixing in a bit of lemon zest for added freshness. If you're looking for a chocolatey option, swapping some cream cheese with melted chocolate can yield a heavenly treat that appeals to chocolate lovers. The key is to ensure any added ingredients complement or enhance the primary flavor instead of overwhelming it.
Additionally, for a gluten-free alternative, there are specialty gluten-free puff pastry options available in many stores. Using such substitutes allows everyone to indulge, regardless of dietary restrictions. Remember, when substituting, it might slightly alter the baking time or texture, so keep a close eye on them to achieve the perfect golden brown color.
Ingredients
Ingredients for Mini Puff Pastries
For the Pastry
- 1 package of frozen puff pastry (thawed)
- 1 egg (for egg wash)
For Sweet Filling
- 8 oz cream cheese (softened)
- 1/2 cup powdered sugar
- 1 tsp vanilla extract
- 1 cup strawberries (chopped)
Optional Toppings
Powdered sugar for dusting, chocolate drizzle.
Instructions
Instructions for Making Mini Puff Pastries
Prepare the Filling
In a bowl, mix the softened cream cheese, powdered sugar, and vanilla extract until smooth. Fold in the chopped strawberries gently.
Roll Out the Puff Pastry
On a lightly floured surface, roll out the thawed puff pastry to about 1/8-inch thickness. Cut into 3-inch squares.
Fill the Pastries
Place a tablespoon of the filling in the center of each square. Fold the corners over to the center and press to seal.
Prepare for Baking
Preheat your oven to 375°F (190°C). Arrange the pastries on a lined baking sheet, and brush the tops with egg wash.
Bake
Bake for 15-18 minutes until they are puffed and golden brown. Remove from oven and let cool slightly before serving.
Serving Suggestions
Dust with powdered sugar or drizzle with melted chocolate before serving.

Pro Tips
- Always keep your puff pastry cold for the best results. If it becomes too warm, it may not puff up correctly during baking.
Storage and Make-Ahead Tips
If you're preparing for a gathering, you can make these pastries ahead of time. After assembling your pastries, arrange them on the baking sheet, cover with plastic wrap, and refrigerate for up to 24 hours. When ready to bake, simply remove them from the fridge, brush with egg wash, and bake as directed. This saves time on the day of your celebration while still bringing fresh, delicious snacks to the table.
For leftover pastries, store them in an airtight container at room temperature for up to two days. If you prefer your pastries warm, you can reheat them in the oven at 350°F (175°C) for about 5-8 minutes, monitoring closely until they are heated through and regain their flaky texture.
Troubleshooting Common Issues
If you find that your pastries are not puffing sufficiently, it could be due to the oven temperature being too low. Ensure your oven is preheated properly to 375°F (190°C) before baking. Also, make sure your baking sheet is not overcrowded, as this can trap steam and prevent the pastries from rising fully. They need adequate space to develop their signature puff as they bake.
Another common issue is filling leakage during baking, which can make a mess and affect the look of your pastries. To prevent this, make sure to seal the edges well. Consider using a fork to crimp the edges tightly after folding. If using juicy fillings, such as fresh fruits, consider mixing in a bit of cornstarch to thicken the filling, reducing the risk of leaks.
Questions About Recipes
→ Can I use other fillings?
Absolutely! You can use chocolate, fruit preserves, or even savory fillings like cheese and herbs.
→ How do I store leftovers?
Store any leftovers in an airtight container in the refrigerator for up to 2 days. Reheat in the oven for the best texture.
→ Can I make these ahead of time?
Yes, you can prepare the pastries and freeze them before baking. Just bake them directly from frozen, adding a few extra minutes to the bake time.
→ What should I serve with the pastries?
A light fruit salad or whipped cream can complement these pastries well, adding an extra layer of sweetness.
Valentines Snacks Mini Puff Pastries
Created by: Evelyn Parker
Recipe Type: Sweet Table Classics
Skill Level: Easy
Final Quantity: 24 mini pastries
What You'll Need
For the Pastry
- 1 package of frozen puff pastry (thawed)
- 1 egg (for egg wash)
For Sweet Filling
- 8 oz cream cheese (softened)
- 1/2 cup powdered sugar
- 1 tsp vanilla extract
- 1 cup strawberries (chopped)
How-To Steps
In a bowl, mix the softened cream cheese, powdered sugar, and vanilla extract until smooth. Fold in the chopped strawberries gently.
On a lightly floured surface, roll out the thawed puff pastry to about 1/8-inch thickness. Cut into 3-inch squares.
Place a tablespoon of the filling in the center of each square. Fold the corners over to the center and press to seal.
Preheat your oven to 375°F (190°C). Arrange the pastries on a lined baking sheet, and brush the tops with egg wash.
Bake for 15-18 minutes until they are puffed and golden brown. Remove from oven and let cool slightly before serving.
Extra Tips
- Always keep your puff pastry cold for the best results. If it becomes too warm, it may not puff up correctly during baking.
Nutritional Breakdown (Per Serving)
- Calories: 200 kcal
- Total Fat: 12g
- Saturated Fat: 7g
- Cholesterol: 40mg
- Sodium: 85mg
- Total Carbohydrates: 22g
- Dietary Fiber: 1g
- Sugars: 10g
- Protein: 3g